
The first time that I made hummus from scratch, I had no idea what I was doing. I was 22 and had just moved back to New York after college, living on my own for the first time. Armed with a brand new food processor that I had scrimped and saved for, I remember that the chickpeas that I used came straight from a can. Too much garlic was thrown in as whole cloves. There was no lemon juice; in its place was lots of olive oil of dubious quality.
Needless to say, that batch of hummus was gritty, harsh, and unpleasant. At the time, I couldn’t figure out why anyone would possibly want to go through the trouble of making hummus at home when you could buy a tub of much better stuff at the supermarket just a few dollars.
Fast forward almost 15 years and times have certainly changed! The thought of store-bought hummus now makes me gag a little. Far superior hummus is so ridiculously easy to make that it boggles my mind why anyone would bother with the other stuff unless they were pressed for time, lacked a food processor, or were camping in the woods.
So what is so different now?
First of all, I know much more about food and cooking than I did when I was fresh out of my undergraduate university, the happy result of having read more, traveled more, eaten more, and cooked more. Secondly, I’ve had some really amazing hummus — more amazing than anything that came out of a supermarket tub. Those experiences alone have given me benchmarks against which to judge my own.
Finally, I have recently had much more practice because my hardcore punk rocker boyfriend is a vegetarian and is addicted to hummus.
You read that right: he’s a VEGETARIAN.
The universe can be very ironic ;-)
For the first few months we were dating, I would always feel a little stab in my foodie heart every time I opened his fridge and saw half-empty containers of mass-manufactured hummus. That little stab soon became a nagging inner voice : “You should do something about this,” it whispered, “No one should have to eat this way.” Once the semester was over, I resolved to stock his fridge and freezer with enough dip to keep him properly fed for weeks.
Homemade hummus is not hard to make, but it does require some advanced planning. You need to soak the dried chickpeas overnight (always use dried ones for superior hummus, never canned). Once soaked and drained, you need to cook them until they are almost, but not quite mushy.
And for truly ethereal hummus, you need to remove the chickpeas’ skins before puréeing them. Ah, the chickpea skins. They don’t need to go. In fact, it’s fiddly and annoying to get rid of them. However you set out to accomplish it, the act alone will make you feel like you need to be treated for OCD.
But trust me when I say that it makes a big difference. If you want hummus the texture of velvet, get rid of those skins!
So how do you do it? You can either rinse the cooked chickpeas under cold water until they are cool enough to handle and then pop each one out of its skin with your thumb and forefinger, keeping the peas and discarding the gross membranes (sometimes I think they look like sad, used bean condoms).
Or you can try another technique that I learned from Yotam Ottolenghi and Sami Tamimi’s recipe for hummus in Jerusalem: toss the soaked and drained beans in baking soda, the grit of which loosens the skins from the peas. With this method, after you cook the chickpeas to a very tender state, the skins kind of disintegrate into a nasty slurry that you can pour off in repeated changes of water. It’s kind of like rinsing rice until the water runs clear.
I’m not sure if making your own hummus is as cost-effective as buying it already made, especially if you use nice tahini and fancy dried chickpeas to do it. I think that because of the volume that I make each time, it works out to costing about the same. That being said, the results are really incomparable.
When my boyfriend dragged a tortilla chip through that first silky, creamy batch and popped it in his mouth, his eyes went wide and he said, “I can’t go back!”
Trust me. You won’t be able to either.
* That is my boyfriend impatiently holding his bowl of hummus because, when you date a food blogger, the camera always eats first.
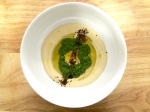
** You can top hummus with almost anything: harissa, chopped eggs dusted with dukkah, tofu :-(, shawarma or, as pictured, zhoug. Also known as zhug or skhug, it is a spicy Yemeni condiment made from parsley, cilantro, garlic, chili peppers, and olive oil. The recipe is also included below.
Ingredients:
For the hummus (recipe adapted from Ottolenghi and Tamimi’s recipe in Jerusalem) :
1 lb. bag of dried chickpeas
1 teaspoon of baking soda
2 cups of good tahini
The juice of four lemons
4 plump cloves of garlic, crushed.
Ice water
Salt
For the zhoug:
1 bunch of parsley, thick stems removed and remaining leaves and stems coarsely chopped
1 bunch of cilantro, thicker stems removed and remaining leaves and stems coarsely chopped
2-3 serrano peppers, stemmed, seeded, and cut into 1/2-inch pieces
1 tablespoon of crushed red pepper flakes
1/2 teaspoon of ground cumin
1/2 teaspoon of ground coriander
1 plump garlic clove, crushed
The juice and zest of one lemon
A pinch of sugar
Olive oil
Salt
Additional garnish:
To prepare:
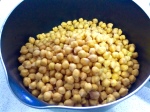
1. Place the dried chickpeas in a large bowl and cover them with about 2 inches of cold water. Cover the bowl with plastic wrap and let them soak overnight.
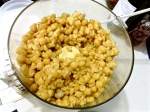
2. Before cooking, drain the chickpeas. Heat a large saucepan or Dutch oven over medium heat and add the chickpeas and the baking soda. Cook for about three minutes, stirring constantly to loosen the skins. Add enough water to cover the chickpeas completely and bring everything to a boil. Be sure to watch the pot carefully as it can easily boil over. Reduce the heat to a simmer and as the chickpeas cook, skim off any foam and skins that rise to the top. Depending on how fresh the dried chickpeas were, it can take anywhere between 20-40 minutes to fully cook them. You will know when they are done when they are very tender and break up easily when you use a wooden spoon to press them against the side of the pot. Once fully cooked (they will be soft but not mushy), carefully pour off most of the liquid. Any remaining skins will have morphed into a sticky, unappetizing slurry that you can eliminate by very gently rinsing the chickpeas in several changes of fresh, cold water, kind of like rinsing rice until the water runs clear.
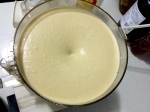
3. Once rinsed clean, drain the chickpeas and process them in your food processor with a pinch of salt until it you have a thick, stiff paste. Add the tahini, the lemon juice, and the crushed garlic and process everything together. Adjust the seasoning, including adding extra lemon juice or extra garlic if you want your hummus brighter or more garlicky. With the food processor running, add ice water, a little bit at a time, to thin the hummus out to your desired consistency. Your hummus is now complete!
4. For the zhoug, process the parsley, the cilantro, the serrano peppers, the crushed red pepper flakes, the ground cumin and coriander, the garlic, the lemon zest and juice, the sugar and a pinch of salt together. With the food processor running, add olive oil in a thin stream until you have the consistency of pesto. Add a little ice water to even out the consistency and adjust the seasoning.
5. To serve, top the hummus with the zhoug and a sprinkle of sumac.


Tagged: easy, recipes, vegetarian


